
Set up your Clover hardware
Your Clover hardware package includes:
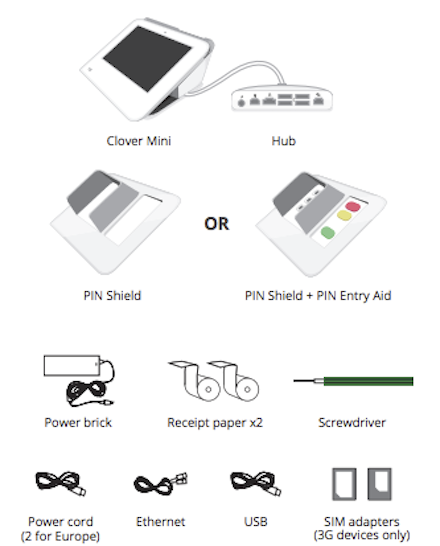
To connect your Clover Mini hardware:
-
Plug the power brick's circular plug into the white hub.
-
Plug the power cord into the power brick and then plug the other end into a power source
-
(Optional) The white USB cord can be used to connect other accessories (such as the cash drawer, scanner, etc.) to the hub.

-
(Optional) In order to switch the direction the hub cable attached to the underside of the device, use the green screwdriver to loosen the hub connector and reverse the cable direction. Tighten the green screw until the screw's head is level with the charging cable.
When the Mini powers on, you will see a Clover logo appear on the screen. Select your primary language to use for setting up your device.and then follow the Clover Setup Wizard instructions.
If you've plugged in the power cable and Clover Mini has not powered on:
- Leave Clover Mini plugged into a power source for at least 30 minutes to allow the backup battery to charge.
- Unplug all cables from the hub.
- Press and hold the power button for 20 seconds, located in the back receipt compartment of Mini.

- Plug the black power cable back into the hub.
- Once you see the Clover logo display on the screen, plug in any other connecting cables and cords that were originally attached to the Mini, or that you would like to attach.
Connect your Clover device to a network
You need an internet connection to activate your device. After your device powers on, the Connect to Network screen helps get you connected.
Connect to the network with an Ethernet cable
Because wireless can be unreliable or spotty (which is often out of your control), we recommend connecting your Clover devices to the internet via Ethernet. This method ensures that your Clover device is connected and online even when your wireless connection is not responding.
If your Ethernet cable is already plugged into the hub, your device automatically tries to connect to the internet. If your Ethernet is not connected, follow the instructions to plug in your Ethernet cable to your device.
To connect your device via Ethernet:
- Plug one end of your Ethernet cable into the device hub.
- Plug the other end into your modem, router, or switch.
Your device will automatically try to connect to the internet.
You will see Successfully Connected to Server when connected.
If your device does not automatically connect, - Tap Check Connection. If this fails, wait two minutes and tap Check Connection button again. If you receive an Error connecting to the network message:
- Check that the router used is connected to the internet by plugging in your laptop or mobile device.
- Check that the Ethernet cable is plugged all the way into the Printer.
- Tap Check Connection.
You will see Successfully Connected to Server when connected.
Connect your Clover device to a Wi-Fi network
To connect to a Wi-Fi network:
- Tap Configure next to the Wi-Fi option.
- From the list of available wireless networks, tap the name of your wireless network. (If your network doesn't appear, tap Add a New Network and then tap the network by name.)
- Enter the network password.
- Tap Done.
- Tap Check Connection.
When the connection is successful, you will be taken through the activation process. If not, you'll be asked to select a different network or re-enter the Wi-Fi password.
If you do not see your Wi-Fi network name, you may have a WEP, or open access, network. Please connect your Clover device to a secured WPA or WPA2 network for successful PCI compliance.
Activate a Clover device
Activation codes are unique for each device. After your device connects to the internet for the first time, Clover sends an email from Clover Support (app@clover.com) containing the activation code. Look for a subject line: Clover Activation Code.
If you ordered multiple devices, look up the serial number to match the activation code for each device.
If you have already set up your Web Dashboard account, you can also log into the Web Dashboard and find the activation code at the top of the home screen.
The serial number of a device can be found at the top of the activation screen or on the underside of the Clover Mini.
To locate and enter your activation code:
- Look for the email from Clover Support (noreply@clover.com) that contains your activation code.
- Enter the 8-digit activation code.
When you activate your first Clover device, you'll be asked to enter an admin passcode. This passcode lets you access all your Clover devices as the owner or admin. If you already have an admin account, the setup process skips this step and your apps start installing.
To change the passcode in the future, go to Employees > Setup on the Web Dashboard.
To set up a passcode:
- Enter a 4-digit passcode that you want to use to access your Clover devices as the owner/admin.
- Re-enter the passcode to confirm.
After entering your activation code and passcode (if required), your apps should start installing. Please wait until the install process is complete. You can customize your Clover device by installing additional apps from Clover’s App Market after setup is complete.
Customize the Clover device
After your apps install, you can set some initial custom settings. To change the passcode settings in the future, go to Employees > Setup on the Web Dashboard.
To customize your device:
- Do you want to require a passcode to unlock your device?
- Yes, require a passcode
We recommend that every employee use a passcode to unlock your device. It provides added security and more detailed reports. - No, don't require a passcode
For terminal parity, you can select the option to unlock your device without a passcode. However, we recommend that you require employees to enter a passcode to unlock your device.
- Yes, require a passcode
- Where do you want to take tips and signatures?
- On tablet screen
- On printed receipt
- Tap Continue.
Comments
0 comments
Please sign in to leave a comment.